
Behind the Shot - Reception Composite
Brian Callaway
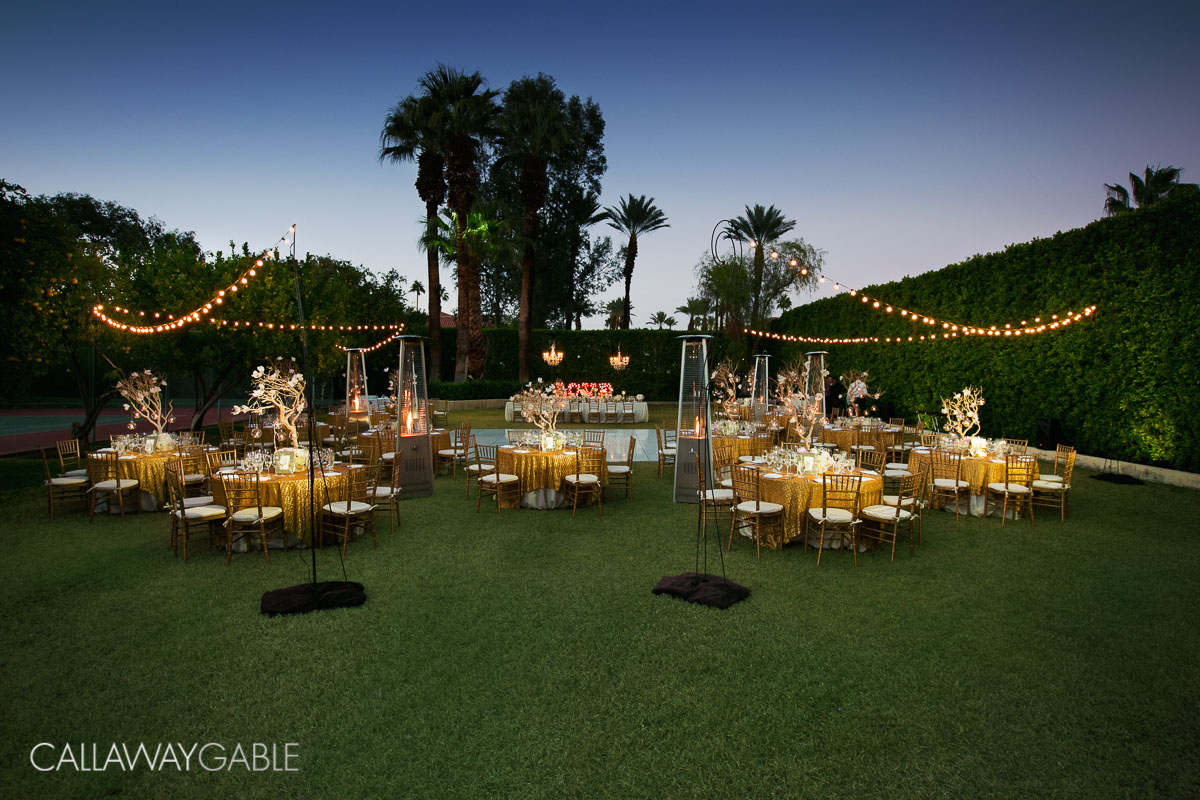
Final retouched composite
WHERE
Sandacre Estate, Palm Springs
TIME
Dusk
My process when shooting a master wide shot of a reception (and any detail shot for that matter) is to take a moment and think. Not only am I mentally composing the shot, I am looking for issues which may prevent the image from being its best. I then make a quick mental Shooting Plan and Post-production Plan.

1st Image
Referencing the image above, it was immediately clear that I was facing two hurdles. First, the tables were not lit. In a wide master shot, the tabletops need to be lit so that the viewer can see the gorgeous details that the planner/designer and bride have worked so hard to create. This makes the planner and designer especially happy - which is really good for a wedding photographer!!!
Second, the grass was yellow and dead. The bride and groom had complained to me about it and were very upset. There was nothing I could do at the wedding to fix the grass, but if I could get an well exposed image, I could change the grass color to green in Photoshop. This meant I needed an image with low noise, and focus from the front of the image to back.
I knew that if I could do this and go above and beyond and create an Extraordinary Experience, the client and planner would be beyond happy and raving fans!
SHOOTING PLAN
- Create 5 images in which each table was lit separately
- Expose with lowest ISO possible, and mid-range aperture
POST-PRODUCTION PLAN
- Composite the 5 photos together
- Remove distractions
- Enhance the sky
- Turn grass green
The first decision was to use the Switronix Torch LED video light to illuminate the tables. Why? It has a variable temperature feature. This light is fantastic for matching the ambient light color, which at this time was dusk. Next I mounted the camera to a tripod so that each image would match up perfectly in post. Also, I was going to shoot with a slow shutter speed so that I could get a mid-range aperture (which gives me a sharper image from front to back) and the lowest possible ISO .
Allie then walked around and lit each table with the video light. I took 5 images (see images below).
That's it. Easy breezy. From concept to execution it took no longer than 2-3 minutes.
CAMERA SETTINGS
1/25 sec
f 7.1
ISO 1600

Images 2-5
POST
In Photoshop, the 5 images were layered on top of each other, and each lit table was painted in to the main image using masks. Finally, the grass was turned green with channels and selective color, and the blue sky was enhanced. The last step was a quick run through AlienSkin Exposure to give the image some warmth and depth. The Post-Retouching took about 10 minutes.