3439 Atwater Avenue
Los Angeles, CA, 90039
United States

888-394-8757

blog-header.jpg

Blog for Photographers

Keep up to date with our latest news by following the Callaway Gable teachijg website blog

Filtering by Category: Behind the Shot

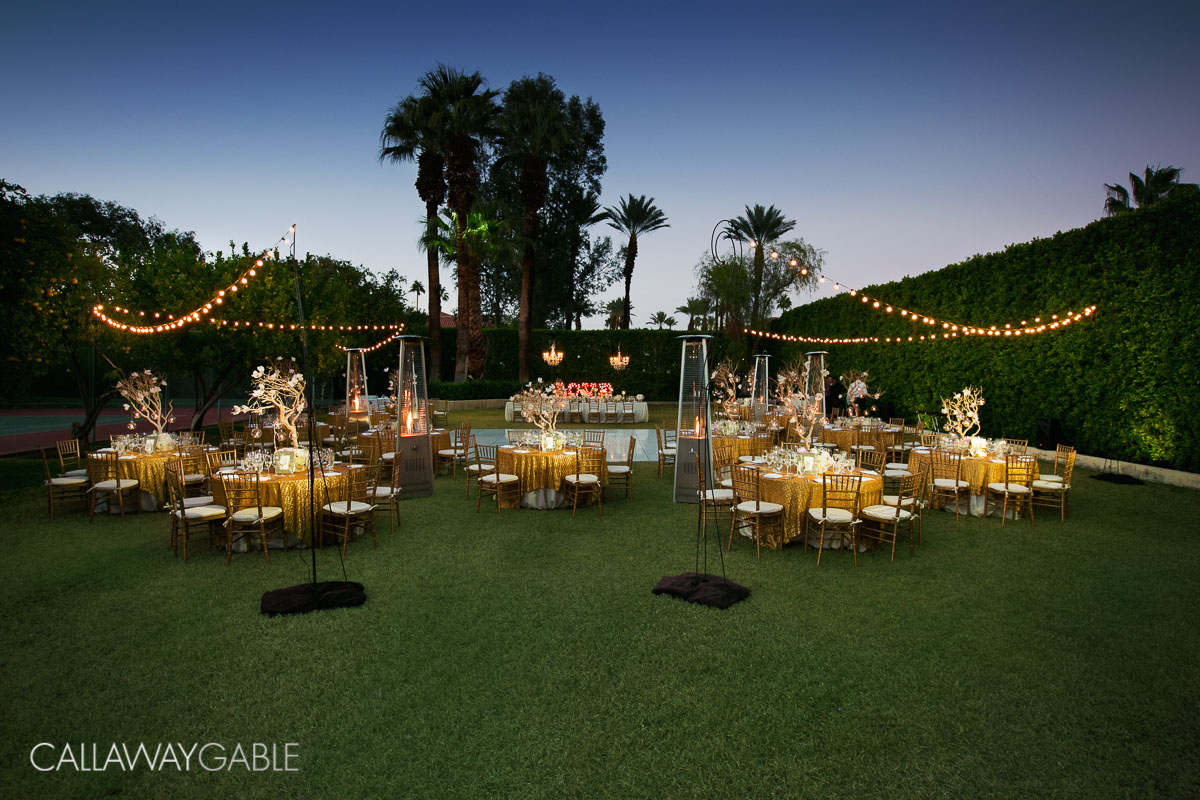
Behind the Shot - Reception Composite

Brian Callaway

Final retouched composite

Final retouched composite

WHERE
Sandacre Estate, Palm Springs

TIME
Dusk

My process when shooting a master wide shot of a reception (and any detail shot for that matter) is to take a moment and think. Not only am I mentally composing the shot,  I am looking for issues which may prevent the image from being its best. I then make a quick mental Shooting Plan and Post-production Plan.

1st Image

1st Image

Referencing the image above, it was immediately clear that I was facing two hurdles. First, the tables were not lit. In a wide master shot, the tabletops need to be lit so that the viewer can see the gorgeous details that the planner/designer and bride have worked so hard to create. This makes the planner and designer especially happy - which is really good for a wedding photographer!!!

Second, the grass was yellow and dead. The bride and groom had complained to me about it and were very upset. There was nothing I could do at the wedding to fix the grass, but if I could get an well exposed image, I could change the grass color to green in Photoshop. This meant I needed an image with low noise, and focus from the front of the image to back. 

I knew that if I could do this and go above and beyond and create an Extraordinary Experience, the client and planner would be beyond happy and raving fans!

SHOOTING PLAN

  • Create 5 images in which each table was lit separately
  • Expose with lowest ISO possible, and mid-range aperture

POST-PRODUCTION PLAN

  • Composite the 5 photos together
  • Remove distractions
  • Enhance the sky
  • Turn grass green

The first decision was to use the Switronix Torch LED video light to illuminate the tables. Why? It has a variable temperature feature. This light is fantastic for matching the ambient light color, which at this time was dusk. Next I mounted the camera to a tripod so that each image would match up perfectly in post. Also, I was going to shoot with a slow shutter speed so that I could get a mid-range aperture (which gives me a sharper image from front to back) and the lowest possible ISO .

Allie then walked around and lit each table with the video light. I took 5 images (see images below).

That's it. Easy breezy. From concept to execution it took no longer than 2-3 minutes.

CAMERA SETTINGS
1/25 sec
f 7.1
ISO 1600

Images 2-5

Images 2-5

POST
In Photoshop,  the 5 images were layered on top of each other, and each lit table was painted in to the main image using masks. Finally, the grass was turned green with channels and selective color, and the blue sky was enhanced. The last step was a quick run through AlienSkin Exposure to give the image some warmth and depth. The Post-Retouching took about 10 minutes. 


Behind the Shot - Video Light

Brian Callaway

WHERE
Noon at the bar in the Culver Hotel in Culver City. 1:00 pm

CAMERA SETTINGS
1/200th of a second at f3.5, ISO 800, Manual Mode.
 

1st test shot

1st test shot

HOW
The video light has become one of our strongest portrait tools. The key with this type of shot is to set your camera exposure for the room, and then add in the video light to illuminate your subject.

In the photo below you can see that the bar was bright and you can see daylight and the glasses on the wall. Using my camera, I metered the room, and then knocked it down a stop or two so that the walls and bar appeared darker.

Next I illuminated Kate and Mike (our bride and groom) with the Lowel GL-1 Hot Light, which I prefer because I can make the light considerably lighter or darker with the GL-1's variable strength dial. If your video light doesn't have variable strength, bring it closer to make it stronger, or step back to make it weaker.

Please note that the entire process: from seeing the shot, to metering, to setting up the light, to completion took about 2 minutes. Using a video light takes make this much easier to do when you have no time. You simply check your work on the back of your camera, and adjust the light as needed.

That screen on the back of your camera is an amazing tool - use it!

POST
Again, very little post was done to the photo. Our goal is to get it right out of the camera. The only thing we did was crop in a bit from the top right and burn the walls and glasses down a bit. Finally we added a little fade and warmth from AlienSkin Exposure. We use Exposure on every retouched image to give it that special Callaway Gable signature look. For more on AlienSkin, click the link below. Use this code to receive 30% off: CAL1410.

 
Lowel GL-1 Hot Light

Lowel GL-1 Hot Light


Behind the Shot

Brian Callaway

1/1600th of a second at f 6.3, ISO 500

WHERE
Under Ann and Conrad's Bungalow at the Four Seasons Resort at Bora Bora 

CAMERA SETTINGS

1/1600th of a second at f 10, ISO 250Aperture Priority.
I shoot Manual Mode 100% of the time - except for this shot. I knew that the light would widely vary depending on how much water was in front of the lens. Additionally I couldn't change my settings very easily with the camera in the Waterproof Case. So I knew that with an ISO of 250, and with a strong mid-aperture, like 10, that I would get a strong shutter speed - whether I was all the way underwater, half in the water, or all of the way out. With my camera in Aperture Priority, all I had to do was push the shutter button.

HOW
My strategy was to lock the focus in manually so that the camera wouldn't struggle trying to find the focus. I knew I would be moving around in the water quite a bit, so the Aperture had to be at least f 10 so that I could get their feet in focus, and the bungalows behind them. At f 10, if I moved closer or farther from their feet, chances are their feet would still be in focus. Treading water, I focused on their feet with Auto Focus, then turned off Auto Focus (back button focus would work, but there is no way to push that button through the Waterproof Case) and fired away.

Swimming back to the bungalow after the letting the current take us out a bit

Swimming back to the bungalow after the letting the current take us out a bit

I stayed in place by using fins (there was a strong current) and sitting on a life preserver to keep me from having to constantly tread water.

UNDERWATER HOUSING

I used the Dicapac Camera Housing. It's is a great deal - it's only $60 on Amazon and works amazing! It is also very light and travels well. I used it over the whole trip and have since used it at several other beach weddings  -it still works amazingly!

POST
There is little post done on this shot, just brought up the exposure on their legs and brought in more sky. I use my own AlienSkin Exposure recipe on every retouched photo which adds warmth, saturation and minimal fade. Here is the untouched original:

original-bora-bora-shot.jpg